In this tutorial, I will show you how to draft the pattern for an empire waist dress with an overlapping bodice at the front, using a shift dress pattern (which has waist darts but no side darts).

Step 1:
Front pattern draft:

I have added a little flare to the basic shift dress pattern, down from the hip.
A to B = Full length
A to C = 1/8 chest + 2.5 inches (or armscye depth)
A to D = Waist length (highest point of shoulder to waist)
A to E = Hip length (highest point of shoulder to hip)
A to F = Neck depth (This is as per your wish. I have kept this lesser---1/8 chest minus 0.5 inch---because the neckline will become deeper than this measurement when you draft the overlapping bodices.)
A to J = Neck width (This is usually 1/12 chest + 1/4 inch, but you can change it according to your taste.)
Draw horizontal lines from A, F, C, D, E, and B, respectively.
C to G = 1/4 chest + 0.75-inch ease (the ease at the chest line may change according to the stretchiness of the fabric you use, fabric shrinkage after wash, and the fit you like. I wanted to make a semi-fitted dress for my 2-year-old daughter, and the fabric I used was a cotton blend fabric. Therefore, I kept 0.75-inch ease for the dress I made.)
Read this useful article, Understanding Ease in Pattern Drafting by Anna to know more about ease in garment.
A to H = 1/2 shoulder
H to I = 0.50 inch (for girls aged 0 to 14. For women, this could be 1 inch for fitted garments and 3/4 inch for loose or semi-fitted garments). You can change this according to the fit. Measure the shoulder width, that is, the distance between the shoulder point at neck and tip of the shoulder. Use this measure to mark point J from I on the line from A.
Draw a line downward from H that meets the horizontal line from C at point K.
K to L = 1 inch
T = Half of I to L
Mark M 0.5 inch from T. Now shape the front armhole G-L-M-I.
D to N = 1/4 waist + 0.50 inch dart intake (dart intake may vary according to the body type. So please change it as per your requirement. Also, you can add 0.25 to 0.5 inch ease if you don't want a snug fit at the waist.)
E to O = 1/4 hip + 1 inch for kids (1.5 inches for ladies)
B to P = 1/4 hip + 2 inches for kids (3 inches for ladies)
Empire line:
The empire line crosses under the bust. Therefore measure from the high shoulder point to under the bust. (You can also measure 3/4th of CD and use it to mark Q from C.) Draw the empire line QR.
The below picture explains this clearly:

Darts:
Mark waist dart base point S which will be 1/12 chest + 0.5 inch from D. The dart length (upward and downward from D) is usually kept as 1/6 chest. Or you can measure from S up to a point 0.5 to 1 inch below the bust point and use this measure to mark the dart length down from S.
I have kept the dart intake (or dart width) for the basic shift dress as 0.50 inch. (You can increase it according to your requirement. For women, dart intake may vary according to the bust cup size. Also, if a side dart is marked, the waist dart intake will become less. The shift dress pattern for children up to 14 years may not contain a side dart. Check this page to know more about darts. Generally, waist darts are not used for children's sizes up to 6 years and also if the bust round measurement minus waist round measurement is less than 4 inches. I included darts in my daughter's dress as an example to help you understand how darts are split when drafting empire waist dresses. It is not necessary to add darts in younger kids' dresses, but you can add it as a style element if you prefer.)
Step 2:
Now as you have made your basic front pattern, cut through the empire line to separate the bodice piece and the skirt piece.
Step 3:
Make the following changes to the bodice:
On the center front mark point T 1 inch from Q. Connect R and T using a curved line as in the figure below. This will be your new empire waistline.
Extend the dart fold line (that is the center line of the dart) such that it meets the new waistline R-T at point X. Extend the dart legs. Discard the old waistline.

After you have made these changes, the front bodice will look like this:

Step 4:
Unfold the front bodice which will look like this:
 Step 5:
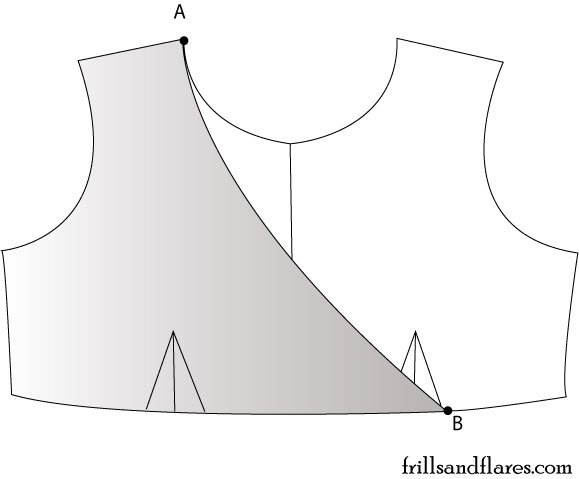
Mark point A on the right side neck end of the shoulder. Mark another point B on the waist line (on the left side of the bodice) at the left side dart leg or at a 2- or 3-inch distance from the center front. Connect the points using a curved line as shown in the figure below (drawn in red in the picture below). This will be your new neckline.
You can also draw a straight line instead of a curvy line if you want the neckline less deeper than what is shown here.

Step 6:
Cut the portion of the front bodice shown by the shaded area. This will be the right side of the front bodice.

Add 0.5 inch seam allowance on all the sides, except for the neckline for which you will need to include 0.25 seam allowance if you line it or use bias tape to cover the raw edge. Extend the dart legs as shown in the figure below.

Flip this pattern and use it to cut out the left side of the front bodice.
 Step 7:
Skirt:
Now, let us move on to the skirt portion.
You need to make the following changes to the skirt:
Mark X 1 inch from Q on center front. Connect R and X using a curved line. This will be your new empire waist line on the skirt. Discard the old one.
Mark Y 1 inch from P on the seam. Connect B and Y using a curved line. This will be your new hemline. Discard the old one.
Extend the dart legs upward from the old waistline (N-D) to touch the new empire waistline such that the skirt dart intake matches the bodice dart intake.
These changes are marked in red color in the figure below.

Step 8:
Add 0.5 inch seam allowance to the waist and sides and 1.25 inches for the hemline fold. Extend the dart legs upward.

That's it! We have drafted the front. Tomorrow I will post the steps to draft the pattern for the back of the dress.
Please feel free to post your queries and suggestions in the comment section under this post. I will be happy to read your comments.
I have posted the draft for the back of the dress here.
Mark waist dart base point S which will be 1/12 chest + 0.5 inch from D. The dart length (upward and downward from D) is usually kept as 1/6 chest. Or you can measure from S up to a point 0.5 to 1 inch below the bust point and use this measure to mark the dart length down from S.
I have kept the dart intake (or dart width) for the basic shift dress as 0.50 inch. (You can increase it according to your requirement. For women, dart intake may vary according to the bust cup size. Also, if a side dart is marked, the waist dart intake will become less. The shift dress pattern for children up to 14 years may not contain a side dart. Check this page to know more about darts. Generally, waist darts are not used for children's sizes up to 6 years and also if the bust round measurement minus waist round measurement is less than 4 inches. I included darts in my daughter's dress as an example to help you understand how darts are split when drafting empire waist dresses. It is not necessary to add darts in younger kids' dresses, but you can add it as a style element if you prefer.)
Step 2:
Now as you have made your basic front pattern, cut through the empire line to separate the bodice piece and the skirt piece.
Step 3:
Make the following changes to the bodice:
On the center front mark point T 1 inch from Q. Connect R and T using a curved line as in the figure below. This will be your new empire waistline.
Extend the dart fold line (that is the center line of the dart) such that it meets the new waistline R-T at point X. Extend the dart legs. Discard the old waistline.

After you have made these changes, the front bodice will look like this:

Step 4:
Unfold the front bodice which will look like this:

Mark point A on the right side neck end of the shoulder. Mark another point B on the waist line (on the left side of the bodice) at the left side dart leg or at a 2- or 3-inch distance from the center front. Connect the points using a curved line as shown in the figure below (drawn in red in the picture below). This will be your new neckline.
You can also draw a straight line instead of a curvy line if you want the neckline less deeper than what is shown here.

Step 6:
Cut the portion of the front bodice shown by the shaded area. This will be the right side of the front bodice.
Add 0.5 inch seam allowance on all the sides, except for the neckline for which you will need to include 0.25 seam allowance if you line it or use bias tape to cover the raw edge. Extend the dart legs as shown in the figure below.

Flip this pattern and use it to cut out the left side of the front bodice.

Skirt:
Now, let us move on to the skirt portion.
You need to make the following changes to the skirt:
Mark X 1 inch from Q on center front. Connect R and X using a curved line. This will be your new empire waist line on the skirt. Discard the old one.
Mark Y 1 inch from P on the seam. Connect B and Y using a curved line. This will be your new hemline. Discard the old one.
Extend the dart legs upward from the old waistline (N-D) to touch the new empire waistline such that the skirt dart intake matches the bodice dart intake.
These changes are marked in red color in the figure below.

Step 8:
Add 0.5 inch seam allowance to the waist and sides and 1.25 inches for the hemline fold. Extend the dart legs upward.

That's it! We have drafted the front. Tomorrow I will post the steps to draft the pattern for the back of the dress.
Please feel free to post your queries and suggestions in the comment section under this post. I will be happy to read your comments.
I have posted the draft for the back of the dress here.
Sleeve draft is discussed here.
The sewing tutorial of this dress can be found here.
You can find lots of free PDF printable sewing patterns on this page on my blog. You can download and use them to create your own clothes.
You can also click the Free Sewing Patterns Page at the top of this blog page (under the blog title) to find more free sewing patterns.
Click the below links to browse through all the pattern drafting and sewing tutorials on my blog.
22 comments:
Wonderful post! I'll be using it as a resource for modifying a shift dress! Thanks for the tutorial!
Thanks Kamela.
hi... firstly.. thank you for the dress pattern but i didnt understand the shoulder part. The H to I part... could someone help me out plz...
Hi Madhubani,
Could you please let me know what you can't understand in the shoulder part? The H to I measure refers to the shoulder slope.
Thank you!!!
Here I show you how to draft the pattern for an empire waist dress with an overlapping bodice at the front, using a shift dress pattern (which has ... empirewaistdress.blogspot.com
U didnt tell how to calculste neck width A-J??
Pls show
Thank you very much Mam, Very good explanation.
Super mem
Thank you so much for sharing the knowledge. This is awesome, in fact I'm going to make for myself... :)
Super pattern
Thank you for your precious post....I always wanted an empire line pattern.
I know your expertise on this. I must say we should have an online discussion on this. Writing only comments will close the discussion straight away! And will restrict the benefits from this information. bridge gymnastics
it's the measurement from one side of the neck up to the shoulder tip
You can have A to J as 7cm
Thanks M.J. de Sousa!
Thank you Ramesh Oviya!
Thanks, Mama The Explorer!
Thanks, Mayanika!
Thanks, Ramesh Oviya!
Thank You!
Oh, am sorry Durriya! Thanks for pointing it out. I have added it now. It is 1/12 chest + 1/4 inch (but you can also change this according to your preference).
Post a Comment